Introduction to Section 2
This section will aim todescribe the different licensing methods and processes used by the LVTN and how it all links together with regard to enforcement and activation.
The differences between Standard and Advanced Licensing will be described, as well and the limitations and benefits of both methods.
If you already have a product that is available for purchase then you may already have a licensing server already set up. In this case you should contact whoever did this previously to see if you can simply use their set up. Also if you are a very big company, or specifically a software company then you may already host your own activation server.
This section will only discuss the licensing services offered by SoftwareKey and how this interacts with the Third Party Licensing and Activation Toolkit (TPLAT) from NI. If you use a different service then you may need to seek additional help/assistance.
What is Licensing
For the context of this guide, licensing is the device used to protect your product from unauthorised copying and distribution. When a copy of your product has been sold you supply the customer with a License ID and Password that will activate the product on their machine.
Due to the many different business models offered by companies this process can become quite complicated “behind the scenes”, while the user experience should be as simple and straight forward as possible.
What Are My Options
If you have ever been anywhere near the community pages of the LVTN Development Centre then you will be familiar with the following diagram:
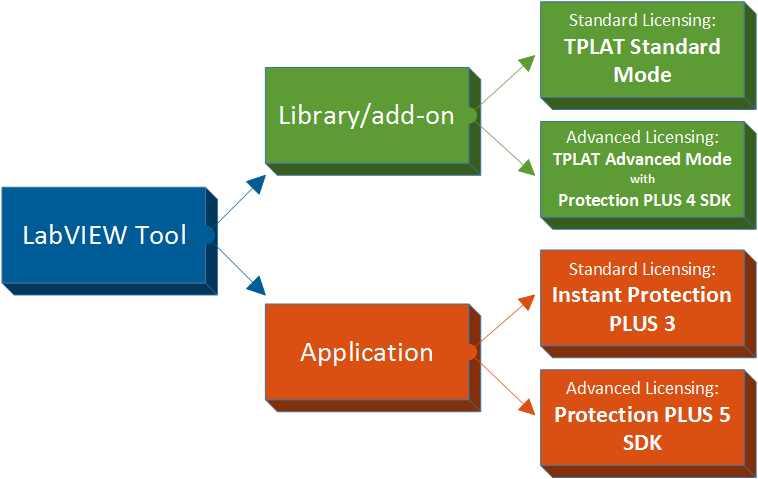
This effectively explains what options are available to license your product, whether it is an Add-On or an application.
As with most things called “Standard” it offers just enough functionality to do what is needed, nothing more and nothing less. In the case of licensing an Add-on this also means free. In addition there are certain limitations on you license, these are explained below.
For the “Advanced” method this is — as would be expected — a little more complex but offers compete control and flexibility of the process allowing you to implement any special features of your license.
For licensing an application there is a requirement to purchase at least one product from SoftwareKey, with the cost depending on your requirements.
Is it worth noticing that in all cases any software from SoftwareKey comes with a 30 day free trial that offers unlimited functionality and access to their customer support staff.
The Software
First of all lets deal with the different software packages that are named in the above diagram.
The Third Party Licensing and Activation Toolkit (TPLAT)
This 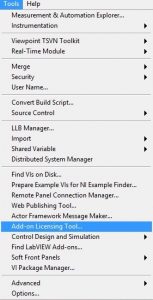 is a free add-on for LabVIEW that can be downloaded using VI Package Manager, a free software tool that is installed as part of the LabVIEW installation. If you do not have VIPM currently on your system then you can download it for free from here.
The TPLAT installs into the default LabVIEW directory and creates an item in the Tools menu.
The TPLAT “wizard” is used only for the licensing of an Add-on and is used for both Standard and Advanced mode. It follows a simple step by step process, whereby the user is required to enter the requested information before moving to the next step.
The differences between the Standard and Advanced processes are explained in the relevant section below.
For licensing of an application then the installed API will need to be added to the block diagram of your product.
Protection Plus 4 SDK
This is a software package available from SoftwareKey that is used to create license files. Using this software you can create a custom license file that includes additional features such as:
- Limited number of runs
- Time limited license
- Advanced encryption methods
- Multiple activation methods
The user interface of Protection Plus 4 looks quite dated and is not what you would call intuitive, there are however some useful help files included. You can create as many license files as you want so it is worth just playing around with the options until you get something like what you require.
To create a license file Protection Plus 4 uses a similar process to SOLO in that you create a “product definition” and then under that you create a specific license. This allows you to have multiple license variations under the same general umbrella.
At the time of writing this it was not possible to just download this package from the SoftwareKey website, you will need to contact them for the link.
Instant Protection PLUS 3
This is a licensing tool for applications that uses a wizard style implementation, and can apply licensing to both .exe and .dll files. It is very powerful from the licensing perspective but lacking in some customisable features.
Instant Protection PLUS 3 is a paid for product from Concept Software and is part of the SoftwareKey System. More information and a download link can be found here.
Protection PLUS 5 SDK
This is a more advanced tool than Instant Protection PLUS 3 and allows complete control over your license and its implementation. There is a specific LabVIEW edition which can run on Windows and macOS, so be sure to purchase the correct one.
Protection PLUS 5 SDK is a paid for product from Concept Software and is part of the SoftwareKey System. More information and a download link can be found here.
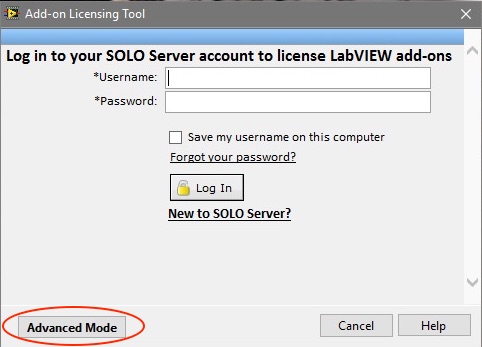
SOLO server account from SoftwareKey (TPLAT)
The SOLO Server from SoftwareKey is a web based licensing server that is used to control the status of your product, for example activated, in demo mode, extended trial etc.
When you create the SOLO account it will be in a “demo” mode, while this still offers the full functionality it cannot be used to issue real licenses to customers. In demo mode all licenses are removed from the server after 30 days.
To activate your account using the complimentary offer from National Instruments then you will need to contact the LVTN team to do this for you. Although it states in the official documentation that this can only be done as part of the submission process, it can indeed be activated earlier.
The web interface has recently been updated and is now much cleaner and easier to find what you are looking for. It is possible to set up multiple users so that you are not dependent on one person to manage the whole process.
Any products/settings/options set up in the demo mode will be transferred when your account is made active.
Library/Add-On – Standard
To license an Add-on using the Standard process is very simple and completely free. You simply need the following items to get started:
- The Third Party Licensing and Activation Toolkit (TPLAT)
- A SOLO server account
There is also a tutorial in the LVTN Community that can be found here which covers everything you need to know to get the Standard licensing up and running.
There is a fully functional license file included with the TPLAT download that can be used to protect your product and is fully compatible with the complimentary version of the SOLO server.
Limitations
It is important to note that as this is a free service, there are certain limitations on the licensing implementation. These are:
- 30 Day free trial
- Royalty free runtime license
- Online activation only
- Only works for products sold on the LabVIEW Tools Network
A royalty free runtime license means that a user can compile your add-on into an application and distribute this without the need to purchase any further license. This could be an issue if for example you give the product away for free to non-commercial users, but someone takes advantage of this and creates a product that uses your add-on.
Note that for the royalty free runtime license it is only possible to build an application once the developer license is activated. So the Application Builder will not work if the license is expired or in evaluation mode.
A step by step guide to the Standard licensing method can be found on the NI website here
If any of these items cause an issue then you will need to go down the Advanced Licensing route.
Library/Add-On – Advanced
Using the advanced method of licensing you get far more control over how you protect your product.
The main difference with Advanced is that you create the license file yourself using Protection Plus 4, so you can add things such as a time limited license, or a limited number of runs.
You can still use the TPLAT Wizard to license your product, but on the opening screen you choose Advanced Mode.
This process is a little bit more involved and will require some information from Protection Plus 4 that was created when you made your license file.
Most of the information required is quite straight forward, such as Company Name and Product Name. Note that the “Purchase URL” field is a link to the product webpages where the user can purchase the product, it is not a link to the SOLO server.
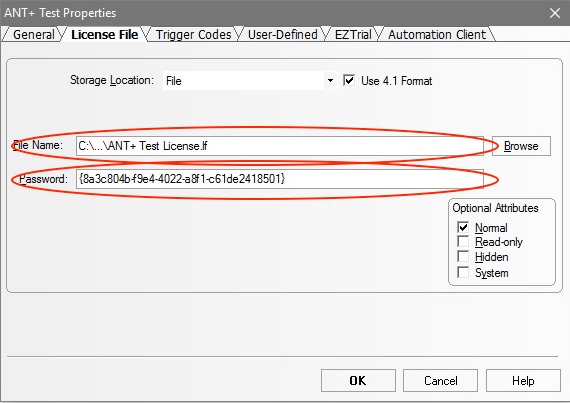
In step 3 you will need the file path and the password of the license file, this information can be found under Product Definition -> Properties in Protection Plus 4. Be sure to check that you have the correct license definition selected in the drop down menu.
The remaining steps are quite straight forward and will depend on your individual requirements. In Step 4 at least one activation method is required, this URL is the link to the SOLO server.
Note that you cannot use a license file you have created in Protection Plus 4 with the complimentary version of SOLO Server, you will need to have a subscription based account.
A step by step guide to the Advanced licensing method can be found on the NI website here
Application – Standard
Licensing an application using standard mode is quite similar to that used for an Add-on in that both utilise a simple “wizard” process that requires little knowledge to complete.
There is mostly no need to change anything within the LabVIEW code as the files are “wrapped” in the license rather than added to the files.
There are some things that are pre-set and cannot be changed, such as the user interface used for activating the product.
Application – Advanced
See the SoftwareKey website for a full comparison of the 2 different products, this can be found here
Enforcement
Activation of the license is controlled by the SoftwareKey SOLO Server. This is configured via a web based control panel and is relatively simple to navigate. Further information regarding the features of SOLO can be found here
The first step is to create an actual product on the SOLO server, this process varies greatly depending on what you are selling. In it’s simplest form it is basically just the name of your product and a short description. If you wish to use the built in eCommerce functionality of SOLO then you will need much more information, such as web page links, product images etc.
Creating a new Product
Create a new product by following these steps:
1 – Create a free trial account or log in to your existing account
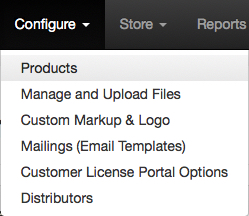
2 – Go to Configure -> Products in the main menu bar
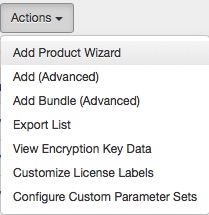
3 – Click Actions -> Add Product Wizard
4 – Fill in the relevant sections of the form. For a very basic product you only need complete the “Product Name” field. If you need help with a specific field then click the “Help” link in the “Add Product” menu bar, not the one in the main menu bar at the top.
5 – Ensure “Enabled” is ticked down at the bottom of the form.
6 – Click Submit
When you return to the Product List window you should now see your newly created item in the list. If you expand the options you should see something similar to this:

Creating an Option
Now that you have created a product, you need to create “options” for it. An option is simply a kind of license, for example:
- Single Seat License
- Student 90 day License
- 5 Seat Discounted License
On the image above, notice that the “Single Seat License” option is already available, this is how it was created.
To start, simply click the “Add New Option” link in the option details section. As with creating a new product, not all the fields are required for all products. The ones described here are the minimum required to get up and running.
Option Name: This should be something relevant, as in the examples given above
Product Option Type: This depends on the type of product, but mostly the default value of “Activation Code” is suitable.
Activations per U/M: This is the number of times the user will be able to activate the product using the same ID and Password. For a single seat license this should be 1, for a 5 seat license it should set to 5, etc.
Deactivations per U/M: This specifies if to allow deactivations, and of so how many times the product can be deactivated. When a product is deactivated it adds an extra activation to the license. Enabling this is beneficial to allow users to move your product to another machine, for example they upgrade their laptop. Note that it can also be abused by users as a way for several people to use the same license at different times on different machines.
Trigger Code #: This specifies what should happen to the license file on the machine of the installation machine. For activating a license on a normal PC, utilising hardware binding then code 28 should used. The full list of options is available in the Protection Plus 4 applications.
Trigger Code Seed & RegKey 2 Seed: These two values are what links the license file you used when creating your add on, and this particular Product/Option combination. These values can be found in Protection Plus 4, under XXXXXX
Make sure “Enabled” is checked under “Other Details” and click “Submit” to save the new option.
You can add as many options as you require, using the “Duplicate” tool under “Actions” should save you some time if only small changes between licenses are required.
For example to change a single seat license to a 5 seat license:
- Open the single seat option
- Click Actions -> Duplicate
- Change the “Option Name”
- Change “Activations per U/M” to 5
- Click Submit
You will now have 2 Options in your product list.
There is no cost involved in creating/editing products and options so spend some time experimenting with the different choices and see which best suits your situation.
TIP: Create a ‘Dummy’ Option that has 99 activations that can be used to experiment with different configurations. This way you don’t have to keep incrementing the activation number every time you change something.
Important Information
License Status for Add-ons
One very important thing that is not made clear is that the license status on the SOLO server is only checked once, when the product is first enabled. After this the status of the license file is checked, this file is stored locally on your machine. This means that once the product is enabled it is not possible to disable the license remotely. Customers can activate/deactivate but there is no control from the server to remotely deactivate a license on a customer’s machine.
As a consequence of this there are certain things that are not possible when using only the TPLAT wizard, such as:
- Offering refunds. After you have given the money back there is no way to stop your customer continuing to use the product.
- Cancelling the license due to non payment. Imagine the situation with a 30 day free trial but your customer has a 60 day payment period. Do you give them the activation codes after 30 days or do you wait for the payment?
- Service subscriptions. Offering free updates for 1 year after purchase, but allowing the product to carry on being used after this period.
These issues are possible to implement, but are not “built in” to the TPLAT. If you require any of these then you will have to use the API to make the calls to the SOLO server yourself to check the license status.
If your license file is made so that it will expire after X number of days, then this will still occur as the time limit will be part of the file and not the SOLO server status.
eCommerce
Not all eCommerce solutions are fully compatible with all license servers. If you already have some kind of eShop on your company website, it is important to check for compatibility before making any decisions at this stage. While some kind of solution is probably possible, there may be the need for some speciality programming, adding both time and cost to your project.
Keep in mind that you are not selling a physical product, you are basically selling a License ID and a Password which will be sent in an email. This needs to be generated by the SOLO server and sent to your customer after payment, so all these systems need to be linked together.
Summary
- Do not issue license codes generated in demo mode to customers
- All settings are transferred when moving from demo to “full” mode in SOLO
- Check compatibility with any current eCommerce solution used
- License status on the SOLO server is only checked once during initial activation (for Add-On/TPLAT)
- If you intend to use the Pro version of VIPM then you do not need to license your Add-on using the TPLAT, the license can be applied during the build of the VI Package. See the next section for more information.