Introduction to Section 3
This section covers how the product should be packaged, how to create the package and what are the options when doing so.
Note that this only covers the packaging and distribution of an Add-On and not an executable. This will be added at a later date.
What is Meant by Package
The term package in this sense is the format of your Add-On, how it is distributed and installed on the end users machine. Distribution is the transfer of your software product from one place to another, this would normally be from a central server to your customers machine. It can however also cover the sending of physical media (CD/DVD/Memory Stick).
It is important to understand that the distribution of the software (your product) is handled differently to the distribution of the activation codes. More on this later.
Distribution Options
When it comes to creating the package to distribute, unfortunately there is currently only one option, that is you must use VI Package Manager from JKI. This is normally installed as part of the standard LabVIEW installation process but can also be downloaded for free from the JKI website.
Although it is understandable why NI have made this choice, it is very disappointing that you are forced in to using a specific product when there are other options out there.[1]
This section of the guide is aimed at VIPM 2014, although there is an updated version for LabVIEW 2017.
Creating a Package
As the name suggests, VIPM is used to create a “Package” that can then be distributed to customers. This package contains the software you have developed, the licensing information and an installer.
If you used TPLAT for the licensing then you have already had experience with VIPM, as the TPLAT is also distributed as a VI Package.
Although VIPM does create a very simple solution, there are a few important things to keep in mind. This is mainly because there are 2 versions of VIPM, the standard version installed for free and the ‘Pro’ version that you need to pay for. Which version you choose depends really on two things:
- How often you intend to create/update packages
- How lazy you are
As far as I am aware, the Pro version of VIPM does not do anything that can’t be done through other means, however it often makes things much easier. This is why it depends on how often you intend to update your current product(s) and create new ones. If you only intend to ever build one version and that’s it, then you can probably spend some time doing things yourself and save some money. However if you intend to update your product on a regular basis, or create multiple products then it may be worth investing in the Pro version. The VIPM API can also be used to automate the build process, so if you really are creating new versions every week then this may also be worth looking into.
A key feature of VIPM Pro is the ability to create and manage repositories that you can use to store/backup/distribute your package. However if you already have a repository server set up (and why wouldn’t you?) then you can also just point the package destination folder to whatever directory is under version control. This leads on to the use of the Trunk/Branch/Tags structure of SVN, but I am not going to open that particular can of worms here.
Other automation tools could also be configured to do some of the extra tasks, but this will not be covered here.
For this section the whole process shall be described as if the Pro version of VIPM is being used, where appropriate it shall be indicated if this is a “Pro” feature (i.e., if you need to have the Pro version, or if it is also possible in the free version).
Using VI Package Builder
There is a section on the LVTN Development Centre on using VI Package Builder, this can be found here. [2]
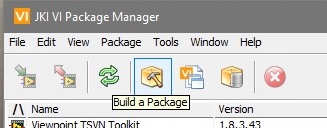
The first thing you need to do is open the VI Package Builder by clicking the Build A Package icon in the main toolbar of VIPM:
Then select ‘Create New’ from the pop up window. In the next window you will need to navigate to the source directory of your code, is it important that you get this correct and do not change the location once you create the package. Changing the location of this will cause the Package Builder to ‘forget’ everything to do with your package and you will need to start again.
Fill in your Product Name and Company Name and click Finish.
As with previous chapters, only the items in each section relevant to getting a basic product ready for the LVTN will be discussed, more advanced options will be covered in a later section. If a section is not described then it is considered an ‘Advanced’ option and not required in most use cases.
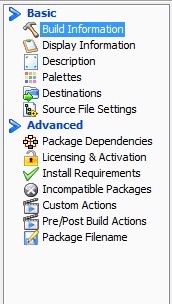
The following describes each of the relevant windows, selectable from the list on the left hand side of the Package Builder window.
Build Information:
When VIPM has located all the relevant files the main Package Builder window will open. The first screen is quite self explanatory, one thing to note is that the ‘Build’ field of the Version Number is auto incrementing so you do not need to change this.
Depending on if you want to include the built packages for each version in your repository, you may want to edit the auto populated “Build Output Directory” path.
Display Information:
Again, the fields on this window are quite self explanatory, this information will be displayed on the Package Information window when a user opens the package in VIPM. This will be shown later.
The “Product Icon” is the icon that will be displayed on the Functions Palette in LabVIEW, this would normally contain a logo or description of the toolkit.
The ‘License Agreement Text File Location” field refers to the license agreement that covers usage of the software, liability etc. and not the license file described in previous sections of this guide. Examples of SLA, EULA type text can be found via Google.
Description:
This is a description of what the toolkit does, what problem it solves etc. This information is displayed in the Package Information window when a customer opens your product, but before it is installed. This will be shown later.
The description should also include any hardware or software requirements specific to your product, even if you think it is quite clear from the product title. For example, if your product is called “Add-on for the CVS-1459RT” then you should still specify it here.
If there are no specific hardware or software requirements, it may also be helpful to mention that as well.
Palettes:
When first opened, VIPM creates a default icon for all the VIs in your source code as well as all the Controls (TypeDefs). In most cases the Controls palette is not required so the check box can be cleared.
When creating your palette it is important to keep in mind the user and their experience of using the toolkit.
- Consider grouping simple tasks together (open, close, read, write etc.) and having more complex items in a different folder.
- Make sure that the glyph/text in the icon is relevant and readable.
- Go to the Rename… option in the right click menu and remove the .vi extension from the name
- Remove icons for the SubVI’s that are not relevant to the user
- Avoid using folders in folders, 2 layers should be ok to organise most palettes.
- Make sure everything has relevant names, including folders.
- Check that each VI has a description, this is a requirement of the LVTN.
Note that if you change the location of your source code, you will lose all your palette configuration including icons.
Destinations:
This window is used to tell VIPM where to install the different items in your source code in the native LabVIEW installation directories. This is important to get right as it tells LabVIEW where things such as example and help files are located within your own directory structure.
If you used the structure recommended by NI in the LVTN Guideline documentation then this should be relatively straightforward to get right. Keep an eye on the “Local Expanded Path” indicator as you select each item in “Destinations”, just to make sure that it all looks sensible.
For “Destination Type” the setting “Directory (Preserving Hierarchy)” option should be one for most situations. [3]
This window should be used in conjunction with the window “Source File Settings” and in my opinion these two windows should be completed the opposite way around.
Source File Settings:
This window shows the directory structure of your source code and using this you specify what that folder contains.
As with the Destinations window, if you used the LVTN guidelines this should be quite straight forward. Most are self explanatory, the folder in your directory structure that contains the help files, should have the “Help Files” destination selected.
At this stage it should be pointed out that the names of the folders, in some cases, are also the names of menu items. Using the Help Files example again, the following relationship between the directory structure, VIPM settings and the installed Add-On is shown below:
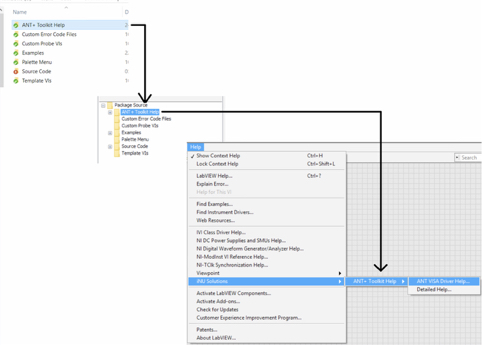
For most folders you can select the option to use the same settings as the source folder. The “Exclude From Package” option should be used for folders containing items not relevant to the Add-On, such as personal documentation or test code.
Note that password protecting the VI’s requires the Pro version. This is obviously possible to do individually from within LabVIEW, or a very simple program can be created to do it in bulk.
Package Dependencies:
In this window you need to specify any other packages that have been used in the creation of your Toolkit.
Common examples could be the OpenG Toolkit, DQMH or instrument drivers. When installing your toolkit, the user will be prompted to also install these packages, if they do not already have them.
Note that depending on other packages should be avoided as much as possible for many reasons, the biggest being future maintainability. Unless you are also the creator of the dependent package then you do not know what will happen in the future, maybe it will be discontinued, removed from VIPM, core VI’s changed etc. This could have serious implications to your Add-On.
Licensing & Activation:
If you have licensed your Toolkit using TPLAT then you only need to specify the location of your license file and the licensed .lvlib in your source code.
If you would like VIPM to take care of all this for you then you will need to complete the second half of this window, this is enabled by checking the “Bind license to library at build time (Recommended)” checkbox. These fields are comparable to the ones in the TPLAT Advanced Mode and should be completed using the same information sources.
Note that binding the license to the library at build time is only available with the “Pro” version and is probably the biggest appeal of making the purchase. This is probably also why it is “Recommended” by JKI.
Install Requirements:
Here is where you specify what Operating Systems and LabVIEW versions your Add-On is compatible with.
The most common change here would be the OS, in that many Add-Ons will not be compatible with both Mac OS and Windows. Other options should be self explanatory and considered depending on your use.
Package Filename:
This displays the full filename of your Add-On, this filename is automatically created by Package Builder and should not normally be edited.
The great feature of this is that the version number of the package is added to the filename. This is great for tracking what version has been issued to which customer, so that in the event of an issue you can go straight to the relevant code.
Building the Package
To build the package click the “Build Package” icon in the main toolbar, it is always a good idea to save the project first.
When the build first starts it will try to find all the files and information it needs, if it fails to find anything it needs you will see an error message. Once completed the VI Package will be placed in the folder specified in the “Build Information” window.
How you organise the built package, the source code, etc. in your SCC is dependent on your way of working. It is however recommended to include the VI Package Build Specifications (.vipb extension) in the current working copy of your source code.
Your Package in VIPM
In the first instance your package will not automatically appear in VIPM. For the package to be listed, one of the following things needs to be true:
- The package is installed on the local machine
- The package is available in LVTN
- The package is available in a repository hosted by JKI
- The package is available in a repository hosted by your company
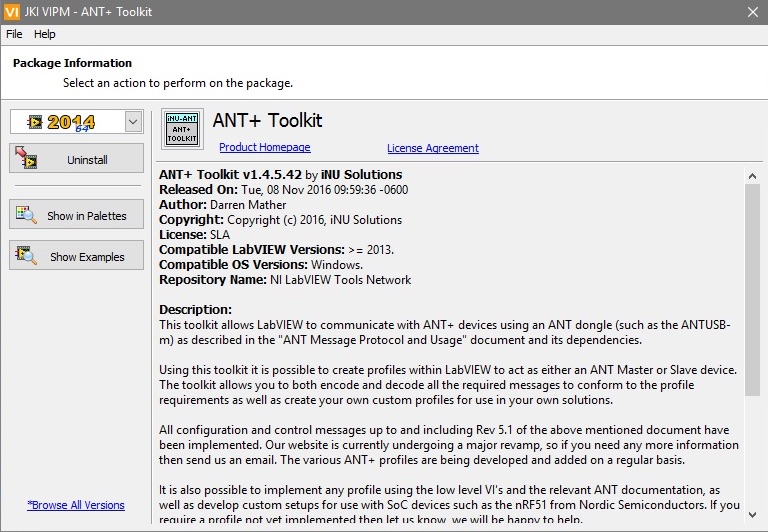
You do not need the package to be visible in VIPM to install it, simply opening the file as you would a standard installation program will launch VIPM. The first window you see will contain some of the information you entered in the Package Builder, such as Company Name, Author Name, Product Description, etc.
An Example:
Summary
-
- Using the LVTN recommended directory structure makes things easier when packaging the toolkit
- Before purchasing the “Pro” version of VIPM, consider your usage of the program, how many updates will you be issuing, how many products will you be producing?
- In the “Build Information” window, use the Release Notes field to give information on this current version, not the whole toolkit.
- Avoid using dependencies on other packages, especially ones you do not control
- Once configured, changing the source code location will cause the package builder to reset many items already configured, including the palettes menu.
[1] With the introduction of LabVIEW NXG this may change [2] I must admit that I have not read/used this guide, so do not know how much detail it goes in to. [3] We had issues with the “LLB” option during building the package. We never discovered what the cause of this was.